Thursday, February 7, 2013

Ox Tail Tomato Sauce


I'll admit that I have very little experience with making Italian style pasta sauces, especially red sauces, but I wanted very much to make a sauce that not only tastes rich and comforting for Christa (who truly appreciates a good bowl of pasta), but would also be loaded with minerals, vitamins, and quality protein as well.  


For this, I decided to use an oxtail.  Why an oxtail?  Well, the short of the matter was that I already had the tail thawed out and ready to use, but with no beef stock on hand (whoops), my original plan of braising it as a stew was not destined to come to fruition.  What I ended up with was far better.

It was very good over pasta, but even better served over seared beef liver.

Ingredients:
  • One ox tail
  • A bottle of red wine (like Cabernet Sauvignon in this case)
  • 40 ounces of diced tomatoes (approximately)
  • Half of a large onion
  • 6 cloves finely diced garlic
  • Dried oregano and basil
broiled ox tail
  1. Clean ox tail and place under broiler for just long enough to brown the meat.  The one that I used took only ~8 minutes to get some good color on it.  Remove the tail from your oven and let sit on the counter to cool enough for handling while you proceed with the base of the sauce.
  2. Pour 2 cups of wine into a sauce pot, and add the garlic and herbs.  Let this come to a boil to remove the alcohol.  Add the tomatoes and reduce to just barely a simmer.  
  3. Cut the ox tail into individual joint pieces and submerge them in the sauce.  Ensure that the pot will not come to a full boil (lots of steam and an occasional bubble breaking the surface are all that you're going for here.  Braise the tail pieces in the sauce for about 8 hours.  This is a good overnight process
  4. Remove the tail pieces from the sauce and pick all of the meat off of the bones.  Place the meat in a container and reserve in the refrigerator for now.  
  5. Dice the onion and saute in a little bit of tallow.  Add this to the sauce, and place the whole pot of sauce in the refrigerator to sit during the next phase of cooking.
  6. Take the bone pieces and bits of connective tissue leftover from the tails and place them in a small saucepan.  Add about a cup of wine to this pan, and enough water to completely submerge the bones.  Bring to a rapid boil for about 5 minutes, and then reduce heat to just barely a simmer.  Let this simmer for 8 more hours to soften the bones and draw out more nutrients from the stock.  By now, the bones should be losing some of their integrity.  I pulled them out at this point and mashed them with the poll of an axe before returning them to the wine for a few more hours in order to maximize the surface area.
  7. By now, you will have drained all of the minerals, vitamins, and flavor from the bones.  Strain the wine 'stock' through a cheese cloth and return to the saucepan.  Reduce to 1/3 original volume and then combine with the tomato sauce and meat that you had reserved earlier.  Let this simmer for a few more hours on low to allow the flavors to meld.  Toss with pasta and top with the shavings of a good aged raw milk cheese.

broiled tail pieces set into the wine to braise
Add enough tomatoes to submerge the meat.
slow cooked beef; picked off of the bones

Wednesday, February 6, 2013

Venison with Onion Gravy


While this sounds like one of those lengthy, overnight/multiday recipes, it is actually something that cooks up quick (dinner can be ready in less than 20 minutes) but tastes like a slow cooked meal.  The rich and meaty dish pairs well with a salad of baby greens or some lightly steamed broccoli. 

You'll need the following:
  • 2-3 lb venison thigh roast
  • 1/4 cup of tallow
  • 1/4 cup of spelt flour
  • 1 cup of beef stock
  • 1 large onion
  • Tallow for frying
1)  In a small sauce pan, heat the tallow and stir in the spelt flour to make a roux.  Stir this constantly until it is the color of chocolate.  Be sure to stir out any lumps of flour to ensure that all of the flour is cooked in the fat.  Once the roux reaches a nice dark color, pour the stock into the pot and whisk rapidly to make a smooth gravy.  Bring this to a boil, stirring often, and then turn down the heat to very low.

2)  French the onion into thin slices and put in a pan with hot tallow.  Fry gently over medium heat to soften and slightly caramelize the onion slices.
 
Soft, flavorful, but not overcooked onion
3)  Add the onion to the gravy and stir in thoroughly.  Simmer this for as long as your heart is content on the stove to continue cooking down the onion and incorporating the flavors of the gravy.
Yum...very beefy already
4)  Meanwhile, place your roast on a cutting board and identify the grain.  Cut the roast into 1/4" thick slices against the grain.  In the same pan that you cooked the onions, fry the venison slices in batches and set in a warmed serving dish.
The grain should be fairly obvious
5)  Spoon the gravy over the plated slices of venison and enjoy.
Something is missing, though...something green, perhaps


Tuesday, February 5, 2013

Beef Stock


Rich, dark beef stock takes several days to make but is well worth it.

A good home-made bone stock is an essential base for so many sauces, soups, stews, and other dishes that it pays to be able to make your own.  By using good quality ingredients to make your own bone stock, you will have a delicious and nourishing medium full of minerals, vitamins, and incredible depth of flavor to utilize in more dishes than you might initially realize.  While the process is time consuming, most of it is inactive and can even be done while you sleep.


Ingredients
  • Beef Bones - mix of blades and knuckles (this recipe used 10 pounds)
  • 3 medium parsnips, coarsely chopped
  • 2 large carrots, coarsely chopped
  • 2 large onions, quartered with skins still on
  • 1/2 of a bunch of celery, coarsely chopped
  • 1/2 cup vinegar

1)  Take the bones and lay them out in a single layer in a roasting pan.
cold and unappetizing
2)  Place in a 350F oven for 45-60 minutes, or until the bones have browned nicely and the marrow begins to bubble.  You might steal some of the marrow for a quick snack at this point.  I'm certainly not going to judge you.
hot, roasted bones smell delicious
3)  Place the bones in a large stock pot (mine happens to be 16 quarts) and cover with cold water.  Add the vinegar to this water.
This doesn't look good...but it will get better.
 
4)   Bring this just to a boil and then down to a simmer.  Allow the bones to simmer alone overnight or longer, but no longer than about one day.  After allowing the bones to have their private time in the stock pot, add all of the vegetables and bring back to a boil.  
All the vegetables!
5)  Simmer this for another day.  The vegetables will have given up just about all of the flavor and nutrients that they have to offer after 18-24 hours, so it will be time to remove them.  Simply strain them out and discard.  The vegetables will mostly be at the top of the stock, while the bones stay on the bottom.  You'll also likely find that you have a serious layer of fat accumulating on top of the water. 

 While I don't encourage you to try to remove the fat at this point in time (we will defat later), if the layer is a good inch thick or so, it's easy to lift off plenty of nice clean fat at this point in time to save for cooking later.  In fact, you can boil the water out of the skimmed fat and then filter it to have some really excellent tallow, which is what I did below.
Pastured Tallow:  greatest byproduct ever
6)  Once the bones have simmered for 3 days, they're just about done and it is going to be time to finish off the stock.  You will likely have needed to replenish the water during this process routinely to keep the bones submerged; I had to add about 2 quarts per day.  At this time, you will have a large pot full of a dark brown liquid and some soft, spent bones.  It doesn't even taste very good because there is absolutely no salt in this. (It is important not to salt a stock, because the final product will either be cooked down a little, or in the case of a demiglace, quite a lot.  Salt the dish that you are making with the stock.) 
bones n' sludge
7)  Remove the bones from the pot, and strain into another large pot through a colander to get any large pieces out of the liquid.  Strain this again through a cheesecloth, and then I personally do one final straining through a paper towel or coffee filter in order to obtain a very clean and clear product.  Let the filtered stock sit overnight in the refrigerator, and any remaining fat will solidify at the top of the pot.  Remove this and reserve for future use before bringing the stock just to the boiling point one last time. 
This!  This is what we have been waiting and working for!
 8)  I like to store my stock in the freezer in quart sized glass canning jars.  I put it in the jars simmering-hot so that as it cools it forms a vacuum which sucks the lid firmly down onto the jar.  I then label the jars with some masking tape (most frozen things in a jar look awfully similar when you are digging through a dark chest freezer in a cold garage).  Note how rich the color is (and the flavorr, but I guess you can't really note that through your monitor...).  This stock came out with this intensity without any reduction after de-fatting. 
liquid culinary gold.
 That's it!  You now have a nutrient and mineral rich stock that is a powerhouse of flavor and the excellent foundation of so many dishes that your imagination will be the limiting factor.  It takes a while to make, but you can make quite a bit of it at once and put it away for future use.  

Now, I'm off to use some for a venison mushroom soup for a very special someone... ;)

Monday, February 4, 2013

Chicken Stock

Chicken stock is definitely a kitchen staple, and something that can be made with very little effort using only leftovers and a few extra vegetables.  A very versatile ingredient, this stock forms the base of many soups (like chicken, butternut, and carrot) as well as providing a more flavorful and nourishing cooking liquid for things like potatoes and quinoa.

We start with a large pot that looks like this...

Ingredients:
  • 3 average sized chicken carcasses; picked free of meat
  • 3 large carrots cut into chunks
  • leaves and other leftovers from a head of celery
  • 2 onions, cut into quarters
  • 1/2 cup vinegar
  1.  Save cleaned chicken carcasses (the leftover bones, skin, etc...from roasted chicken makes excellent fodder for the stock pot) in the freezer until you have enough to make stock.  In my 16 quart stock pot, I prefer to use 3-4 carcasses, but you can always make a smaller amount of stock from a single chicken.
  2. Put carcasses in a large pot and fill with cold water and vinegar.  Bring this just to a boil and reduce to a simmer for several hours, skimming any scum that rises to the surface.
  3. Add vegetables to the pot and bring back to a boil.  Simmer for another 18-24 hours before straining through cheese cloth.  Place the strained stock someplace cool in order for the fat to solidify.  Remove the fat from the stock, bring to a boil again, and then prepare for your recipe or for storage.  I like to store it frozen in pint and quart sized glass jars in my deep freezer.
...and after 24-20 hours of cooking, looks like this.  Ready to strain.

Sunday, February 3, 2013

Buffalo Chicken Calzones

I'm not always around to make sure that Christa has something hot, fresh, delicious, and also nutritionally solid to help keep her going through the day.  Some days I don't get to see her at all (these aren't great days), and I wanted to cook something that would store easily in the freezer and take minimal effort to convert into a hot and satisfying winter meal...something that she could just grab frozen and toss in the toaster oven in between teaching swimming lessons and skiing lessons.  What I came up with is a variant of one of our favorite types of pizza that we had made last summer, but rather than make a bunch of little fragile and messy pizzas, I opted to roll them up into sandwich sized calzones.


I whipped up a batch of my favorite pizza dough and roasted a chicken the day before I was planing on actually making these.  The dough needs to rise overnight, and I find it much easier to work with leftover chicken that has cooled down (also the whole-bird roasting process makes it taste so much better than quick cooking chicken parts).


So to start, we have some dough that has come to room temperature:
This will make about 12 individual calzones
...and also some cleaned chicken meat that is a little bit colder than room temperature:
Oh the possibilities....
Now would be a good time to put a pizza stone in the oven and turn that oven up to 500F.  It's hot, but you really need a hot oven to pull off bread.  I have seen plenty of failed breads due to a fear of the application of serious heat.  While the oven heats up and the dough is resting, combine some cayenne pepper sauce, butter, and black pepper in a small saucepan like so:
Rich and spicy...at least, it will be soon. 
Melt the butter while stirring every now and again until you have a buffalo sauce:
It really is that easy
Calzones need cheese...some kind of cheese.  For these I selected a buttermilk blue raw milk cheese:
This is entirely gratuitous....and so delicious.  Just enjoy it.

Now, it's time to actually make these calzones...mini strombolis...pizza sandwiches...whatever.  Assemble all of the ingredients:

rock and roll
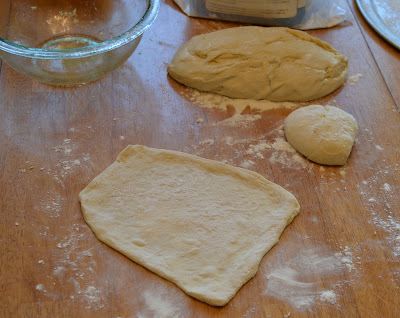
Cut the dough into twelve or so small portions, depending on how large or small you would like the calzones.  I recommend going for 10, as I am making in this recipe.  Roll each ball of dough out very, very flat:

...and cover with toppings.  Resist the urge to pile them sky-high, or you will never be able to fold these things up and transfer them to the oven.  Show a little constraint with the filling and the results will be better for it.
that's about all this thing can hold without bursting
Fold the dough over and pinch it together in as neat or a shape as you can.  Some of these are neater than others, and while I would like to say that the messier looking ones were the first ones, I'd be lying...so I'll blame trying to do all of this while operating a camera.
it's not a tumor!
Once you have transferred the closed but yet uncooked calzones to a sheet pan that has been heavily dusted with corn meal (to prevent them from sticking to the pan and also later on in the oven), brush them lightly with oil, top with a pinch of sea salt, and then cut some small slashed in the top to allow the steam to escape (but not the cheese).
oiled and ready for heat treatment

Put the lumpy little loaves into your oven directly on the hot stone for about 10-12 minutes.  Because my goal was to make a sort of healthier option to a "hot pocket", I undercooked them ever so slightly so that they could finish browning in the toaster oven.  Let cool completely before wrapping in foil and then sealing tight in a freezer bag for cold storage.


Buffalo Chicken Calzones
  • pizza dough (that's a good recipe)
  • cooked chicken meat (some leftover roast chicken would be perfect)
  • 1/4 c butter
  • 1/4 c cayenne hot sauce
  • 1/3 lb or so of a very good blue cheese
  • olive oil
  • salt
  • corn meal
  1. Take dough out of cold storage and let warm at room temperature for about two hours.  Put your pizza stone into your oven and bring the temperature up to 500F.
  2. Meanwhile, combine the butter and hot sauce in a saucepan and just melt to combine.  Shred the chicken into bit size pieces and crumble the cheese likewise. 
  3. Divide the dough into about ten small balls, and roll them out very flat and thin.  Top with chicken, cheese, and sauce.  Fold over and crimp.
  4. Set uncooked calzones on a tray, brush lightly with olive oil and salt.  Cut slits in each calzone to let steam escape.  
  5. Put the calzones in the hot oven directly onto the stone for about 10 minutes.  You should just ever so slightly undercook these if you are planning on storing them for future meals as I did here, because they will finish browning when they're in the oven or toaster oven later on.  Dust the stone with corn meal prior to laying the calzones on it to prevent sticking.
Whenever you want a hot cheesy pocket of goodness, just pop one of these straight from the freezer into a 375F oven or toaster oven until it is slightly more toasted and heated through.  Enjoy, whether making them for yourself or the one that you love.

-J


Saturday, February 2, 2013

Pizza Dough

This all-purpose pizza dough is great for pizzas as well as calzones and stromboli and even just making salty flatbreads.  A very slow, low temperature rise is key in giving the body and workability to this particular dough.  

Measure twice, cut once...works for breads, too.

Ingredients:
  • 20.25 ounces of bread flour
  • 0.44 ounces of fine salt
  • 1 pkt of instant yeast
  • 1 3/4 cup of ice cold water
  • 1/4 cup of olive oil


  1. Combine all ingredients in a large mixing bowl and stir together vigorously to develop the gluten fibers.  Once the mass begins to take shape as a dough, dump it out on a floured surface and knead.  A good way to tell if you are done kneading is to observe the dough and see if it is more interested in sticking to itself than it is to you or your counter top.  Also, if you pinch off a small ball of dough, it should be easy to stretch it thin enough to nearly see through it before it breaks.
  2. Don't let it fool you...it's just resting.
  3. Once the dough is kneaded, place in a large oiled bowl and store overnight in the refrigerator, where it will slowly rise.  You can take it out the next day and let if rest at room temperature for about an hour before using, or store it in the fridge for up to 3 days.  Roll it out flat on a floured surface, and you are ready to choose your toppings/fillings.


Maple Butter Oatmeal

This is my favorite food right now. I have it for breakfast, as a midnight snack, and everything in between. The butter melts and combines with the maple syrup and cream into a rich, heavenly good-for-you treat. It's like pancakes in a bowl.

Once the oats are prepared (look for an upcoming post on that), it's quick and simple to make. Just stir and enjoy!


Maple Butter Oatmeal
1/2 cup cooked steel-cut oats
1-1/2 T grassfed butter
2 T grade B maple syrup
2 T grassfed cream

Combine the warm oats with the butter, maple syrup, and cream. Stir until combined.