Showing posts with label tips. Show all posts

Sunday, February 24, 2013

Sprouting Grains

It is only fairly recently that I have begun incorporating sprouted grains into my own diet, and now by extension we have both begun to enjoy them with some regularity.  It wasn't really the mystery of the process that had prevented me from attempting to do so in the past, but rather the lack of any real need.  Personally, I don't have a great deal of desire for most breads or cereal grains.  Once I changed my dietary habits years ago, I found that I didn't really miss bread all that much, and that while I have no issues with gluten or any other component of wheat, I just rarely had the desire.  This is not to say that I don't appreciate a good piece of bread (or pizza  or pie crust) every now and again, and I did go through a serious baking kick a couple of years ago where I finally figured out how to consistently produce good leavened breads in my own kitchen, but given my own natural food predilections, I could and do easily go months in between having any baked good or really any grains in general.  The one exception to this is oats; I really like oats and I eat them all of the time (usually soured), but oats are good enough for me and I never grow tired of them.

Christa likes bread a whole lot, though.  She is also generally a big fan of cereal grains and pasta in particular.  It was partially due to this that after putting together a batch of tabbouleh together one afternoon that I started to consider some healthy grain options that we could both enjoy together.  I like the idea of sprouting grains for the same reason that I like to sour my oats - make the nutritional quality greater for the same amount of calories with just a little extra investment of time.

Grains are cheap, too, relatively speaking.  This appeals to me, because quality pasture raised animal products (meat, milk, eggs...) are not.  It's good to be able to make up the balance of one's caloric needs with something that only costs a couple of bucks at most per pound.  I decided to go with hard winter wheat berries, as they were only about $1.50/lb and I thought that we might be able to use them in much the same way as bulgur.

The procedure is very simple, and I'm happy to say that even on my first attempt that I had a great batch of wheat sprouts.  I usually sprout about a cup of wheat each week, which gets us through for a couple of servings.  In order to sprout wheat, or by extension just about any other whole grain, you'll need a jar of some sort with a semipermeable cover that will allow water and air to circulate while containing the grains.  I use an old glass jar that I saved and make a makeshift cover out of a rubber band and some cheesecloth. 
The first thing that you'll need to do is to soak the grains in warm water for about 8-12 hours.  This will rehydrate them and initiate the sprouting process.  You can see below how the grains have plumped up a bit after the initial soaking period.
Now, pour the water off of the grains, rinse again with warm water, drain, and place them in a dark spot (I used my food dehydrator because it is on the kitchen counter already and is quite dark inside).  Any box or even a paper bag would be just fine.  Lay the jar on its side as shown, in order to give the grains room and to allow air to circulate around them to avoid growing mold.
Now, every 12 hours simple rinse off the grains with more fresh warm water, drain, and return them to dark storage.  The rinsing keeps them moist without soaking them (an entirely different process).  Within 2-4 days, depending on the grain and the temperature, the grains will have sprouted.  You can see below how these have just barely begun to sprout.  Note the small white protrusions. 
In another 12-24 hours, they look like this when I do wheat:
This is when I stop the process by placing the sprouts in the refrigerator in a covered container to be used in cold salads (toss with parsley, olive oil, and balsamic vinegar), or steam them and coat with butter and salt, or maple syrup, honey, or anything else that you might put on a hot breakfast cereal.  Use your imagination with these; wheat is a fairly blank canvas (though the sprouted wheat does have a really excellent flavor and texture without the addition of anything else).  The sprouts will keep for several days once refrigerated.  


Monday, February 11, 2013

Rendering Fats

Tallow and Lard

Tallow and lard are two fantastic cooking fats, each with their own unique properties.  While it takes a few hours of fairly passive work to produce these kitchen staples, you can easily make enough to last for a year in one kitchen session.  I think that it's a shame that both of these fantastic ingredients have fallen out of favor in so many modern kitchens.  Whether for browning meats, sauteing onions, baking pies, or the beginnings of an incredible gravy, there are some instances when you really can't substitute for the originals.  By making your own from known sources of animal fat, you'll also be able to compliment your diet with a fantastic array of healthy lipids. 


Many of the recipes that we post here do in fact call for either lard or tallow as a minor ingredient, so I think that it would be worthwhile not only to talk about the applications of each, but also why we use them and go over a simple step by step of how you can keep your own kitchen stocked with both.

To start, why should we go through the trouble of producing either tallow or lard, and for that matter what exactly are they?  Both are the rendered forms of animal fat from either cattle (tallow), or pigs (lard).

Tallow on the left; Lard on the right


Tallow is mostly composed of heat stable saturated fats (55%) and monounsaturated fats (40%).  The small amount of polyunsaturated fats will have a favorable ratio of close to 1:1 omega 3 to omega 6 if you source your beef fat from pasture raised cows.  Tallow is naturally resistant from going rancid.  The fats from pasture raised cows also contain natural levels of conjugated linoleic acid (CLA).  Food fried in tallow has excellent flavor and tends to absorb less fat than that fried in vegetable oils.    Anytime that I want to impart some subtle, almost beefy flavor to a food such as when browning meat, or cooking onions, or making gravies, tallow is my first choice.

Lard is actually made up mostly of monounsaturated fats, but like tallow contains a healthy compliment of saturated fat as well, including the antimicrobial palmitoleic acid.  Lard is softer than tallow when chilled (tallow is hard and nearly waxy, while lard tends to be very firm like butter).  Lard also imparts no flavors to the dish, but will make anything cooked in it exquisitely crisp.  Sometimes I will rub lard on the skin of a chicken before roasting, but it's also fantastic for frying shrimp, cooking potatoes, and as a must-have ingredient in pie crusts. 

For more details on the actual fatty acid contents of both tallow and lard, I would refer you to this excellent book:  Know Your Fats

The advantage of rendering your own lard and tallow are that you can be very picky about the animals that you select when buying the fat.  "Garbage in, garbage out" applies here, and if you want to heave healthy fats, much like healthy meats, you must choose animals that have been fed and raised properly.  Even pasture raised, grass-fed beef fat from the small-scale farm near me where I buy most of my meat from runs only about $3/lb, so it is well worth the investment.  Through rendering the fats, they become easier to work with (rather than cut off a slab of fatty tissue, you can scoop out the desired quantity from a jar) and also last longer in cold storage (the water and proteins and other bits that might rot have been removed from the fat). 


All that being said, it is time to produce some rendered fats.  The following example uses beef fat, but the same process applies for pork fat, lamb fat, or even butter (which would yield ghee).


Begin by thawing out the fat that you have obtained, if necessary.  At this point, the material that we are referring to as 'fat' is actually a collection of lipids, connective tissue, water, blood vessels, and possibly some bits of muscles as well.  The goal is to extract only the lipids (fats) from this mass of animal fat.
several pounds of hard beef fat from a local pastured cattle

 In order to expedite the rendering process, it is necessary to increase the surface area of the fat.  do so by cubing the fat into 1/2-1" pieces with a sharp knife.
Place the pieces of fat in large stock pot and add just enough water to barely cover the bottom of the pot.  While not entirely necessary, starting out with the water in the pot will help prevent browning or burning of the fat.  This is not something that we really want to cook or impart any such flavor to.
Place this on the stove and turn on to medium low.  The water in the pot should just begin to simmer, and the fat should not fry.  If that fat starts frying you have the heat up too high.
Eventually, the fat will warm up and begin to soften.  Some of the actual fat itself will begin to melt out of the chunks, along with some water.  The liquid that begins to accumulate in the pot is a mixture of water and liquid fat.  Again, make sure that the heat is kept low enough so that you don't end up frying any of this.

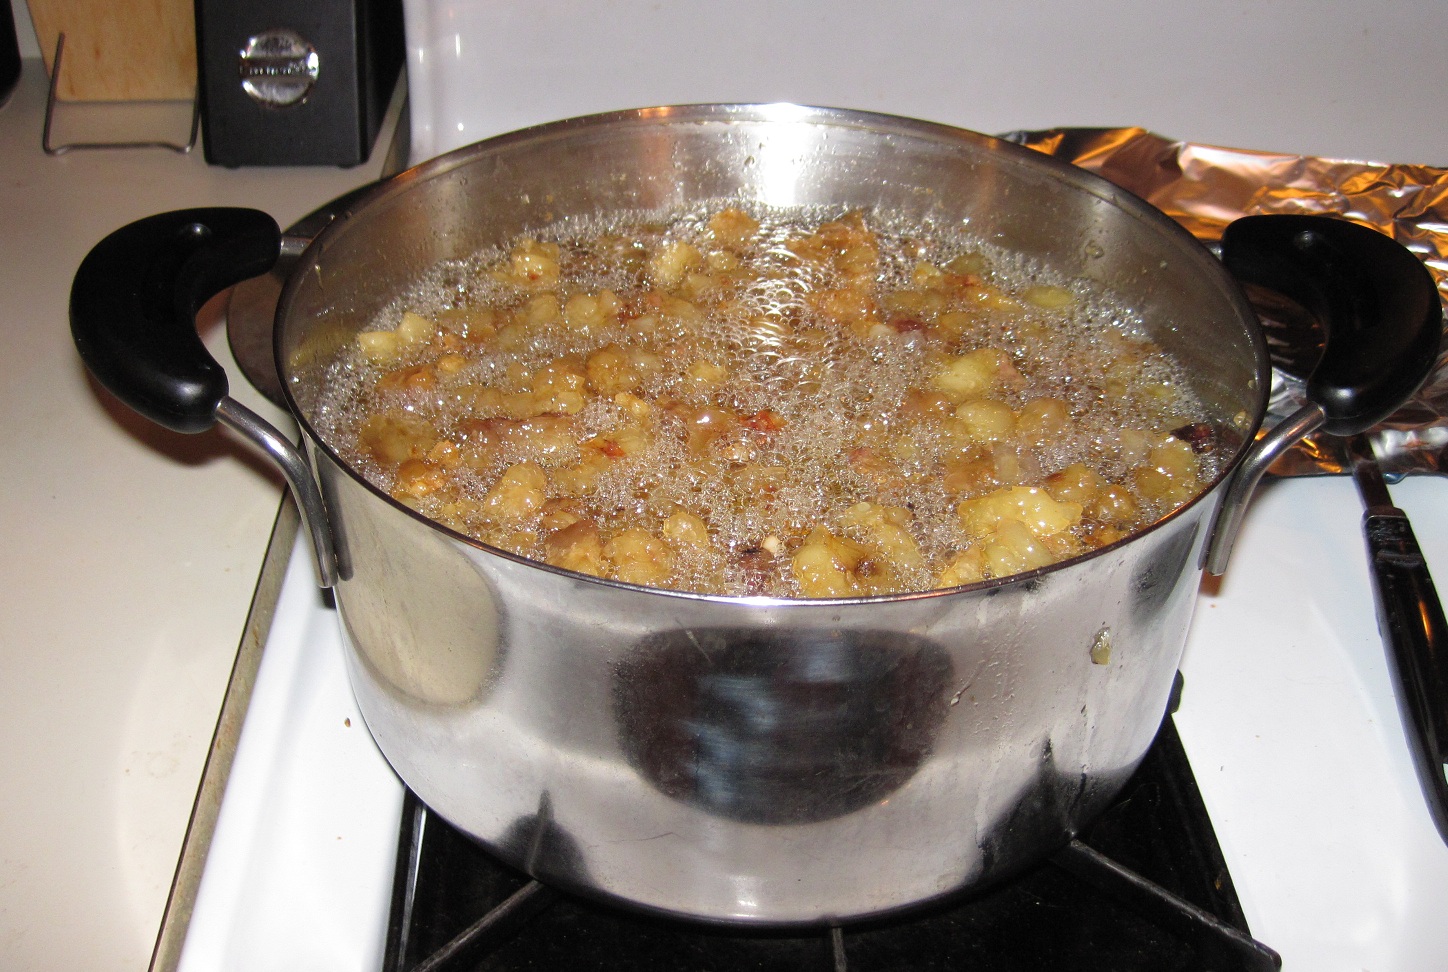
After about an hour, perhaps longer, the chunks will have shrunk quite noticeably and the liquid will probably be bubbling away.  While the chunks of tissue will begin to get darker, ensure that the fat isn't frying by observing to see if there is any smoke.  The bubbles forming should be solely from the rapidly boiling water that is now escaping your pot.  This operation will take a couple of hours, so don't try to rush it by burning or frying your tallow.
Once the fat chunks have reduced in size considerably, it is time to begin straining out the liquid.  I recommend using a coffee filter, as cheesecloth really isn't fine enough to capture all of the little particles that are going to be suspended in the liquid.

 Eventually the pieces of fat will have given up all of the liquid that they can and will begin to get much darker.  When this point is reached, stop the rendering process and either drain and reserve the little tissue nuggets or discard them.  Some people like saving these to add to soups, but personally I have not had much luck with that.  Transfer all of the filtered liquid to a very clean pot and bring the temperature up to 250F.  If the liquid does not bubble, it is pure fat and the rendering process is over.  If the liquid bubbles, it is merely the remaining water boiling off, so hold the temperature fairly constant until the bubbling ceases.  Don't overheat the tallow or you may potentially burn it once all of the water has boiled off.
liquid tallow looks almost golden in color

Liquid tallow from grass fed cows will have a yellow to amber appearance.  The fat tends to accumulate vitamin E, CLA, and beta carotene that are lacking from grain-fed feedlot cattle.  It will be yellowish to slightly off-white once cooled.  Leaf lard (below) should be almost totally clear.  It will solidify to a snow-white solid once cooled.
liquid leaf lard, poured into jars and cooling down

Store a little of your rendered fat in a glass container in the refrigerator.  The remainder can be jarred and put into the freezer for long term storage, or you can even pour it into muffin tins and then freeze the little fat pucks in vacuum bags until you need them. 

Tuesday, January 29, 2013

Roasted Beets


Beets can be a somewhat vexing vegetable to tackle if you are unfamiliar with them.  They have a fairly sweet flavor that takes ownership of most dishes in which they are incorporated, and the ruby red color will infiltrate anything that you add them to (and do a number on skin and clothing, as well).  I find that the easiest way to cook them also results in the tastiest results, so I roast them whole.  Less work, less mess, delicious end product.

When selecting beets, try to get a group that are uniform in size, which will simplify the cooking process even further.  A larger beet will take longer to cook then a smaller one; it's as simple as that.  Choose beets that have fresh, vibrant leaves still attached and that are heavy and very firm.

Get the beets home and cut off the stems very close to the beets themselves.  I save the greens to put into soups and other dishes.  Wash the beets thoroughly, place them whole in an oven safe dish, and bake for about an hour at 375F.  Pull them out and let them cool down enough to peel, then slice and serve them.  Roasting the beets intensifies the flavor, as opposed to boiling them.  Cooked beets are also easier to peel and much, much easier to slice  We like them as a hot side dish to roasted chicken, or served cold the next day for lunch with egg salad (or some of that leftover chicken).  

Sunday, January 27, 2013

Parsley and Jicama Bulgur Salad

Parsley and Jicama Bulgur Salad

Tabbouleh Variations


He cooks, she eats, they blog.  That's the core of what we're doing here, and here's a simple recipe that I tossed together (literally, hah) for Christa for a late lunch today while she is out on the slopes.

I like tabbouleh because there is no end to the variety of ingredients that you can add to a cold bulgur wheat salad.  It travels very well, it's easy to make and store beforehand, and it's a handy way to utilize leftover vegetables that you may have laying around from some other project.  For this particular variation, which serves two, you will need the following:

  • 1/2 cup bulgur wheat
  • 1 large bunch parsley
  • 2 medium tomatoes
  • 1/3 cup of lemon juice
  • 1/2 cup of diced jicama 
  • 1/3 cup of good olive oil
  • salt/pepper
  1. Pour 1/2 cup of boiling water over the wheat and let sit for about an hour.  The wheat will absorb all of the water and then cool down to room temperature while you prepare the rest of the ingredients.
  2. Dice the tomatoes and jicama.  Toss them with salt, pepper, and the lemon juice in a large bowl.  I was able to get all of this juice out of a single monstrosity of a lemon - you may or many not need more than one.
  3. Pick all of the leaves off of the parsley and reserve the stems for another project (I save them to put into smoothies, but that's up to you).  Shred the leaves coarsely by hand and then fold them into the other vegetables.
  4. Toss the cooled bulgur wheat into the bowl with the rest of the ingredients and toss around to coat well with the lemon juice.  Let this sit for a few minutes, as the wheat will absorb the juice very well right now, but not so well once it is coated in oil.
  5. Before serving, drizzle the olive oil over the salad while you toss to stir.  Feel free to add less or more as you see fit.  The oil gives body and substance to the dish along with great depth of flavor, and plays well with the bright acidity of the lemon.  Finish with salt and pepper to taste.
I packed this up as a complete lunch with two hard boiled eggs and a little bit of crystallized ginger, as you can see below.  Protip: peel the eggs* if you are going to pack them for a lunch; the recipient will have a much easier time dealing with them when it is time to eat.

I don't have my camera with me today, so here's a low resolution cell-phone shot.  Not exactly food porn, but I want to include some kind of visual here for you:
These divided containers are really great


*Peeling hard boiled eggs:  We like to boil them a dozen at a time and store in the fridge for easy snacking later on.  The easiest way to peel an egg out of the fridge is to put it in a coffee mug and pour boiling water over it.  Let it sit there for just a minute - the temperature change will cause the shell to expand slightly and pull the shell membrane away from the egg white.  Peeling it while the shell is warm is very easy, and you won't spend 5 minutes picking little bits of stuff shell off of your eggs later on when it's time to eat them on the go.