Tuesday, February 19, 2013

Carrot Soup


I like to make simple creamy soups our of root vegetables or squash combined with a meat stock base.  My go-to vegetable is butternut squash in chicken stock, but as Christa is not a fan of that particular gourd, this time I tried carrots for a similar effect.  The addition of ginger plays well with the roasted carrots, and the real cream turns the soup into a velvety meal.

To make this soup, you will need the following:
  • 2.5 lbs of carrots
  • 10 cloves of garlic
  • 4 or 5 sprigs of fresh rosemary
  • 1 quart of chicken stock
  • olive oil
  • butter
  • 1/2 of a large white onion
  • 1 cup of heavy cream (preferably non-homogenized grass-fed)
  • 1 cup of ginger infused water*
  • herbes de provence
  1.  Peel the carrots and chop into large rounds.  Place them in a baking dish along with the garlic and rosemary.  Drizzle just a little bit of olive oil on top, and put them into a 375F oven for an hour to roast.  Discard the rosemary afterwards and put vegetables aside.
  2. Dice the onion very finely and saute in a large saucepan with about a tablespoon of butter.  When the onion is very soft and translucent but not browned, pour the stock into the pot and add the roasted vegetables and herbes.  Simmer this gently until the carrots are soft and mushy.
  3. Take an emulsion blender and begin to liquify the contents of the pot.  At this time, add the ginger water (it will help to increase the volume of liquid while you are blending).  Once the soup is smooth, turn off the heat and use the blender to incorporate the cream.
carrots, garlic, and rosemary all ready for the oven

After blending all of the ingredients, it's ready to serve.

That's all there is to it.  The soup is warm, creamy, and just a little bit sweet, however the sweetness is cut by the ginger which is in turn mellowed slightly be the cream.  Pack it in a hot thermos to take for lunch with a couple of hard boiled eggs, enjoy a steaming cup of soup on a cold evening, or just pour it on your lap.

-J


*Ginger infused water:  Take a finger of ginger, peel it, and dice if up into very small cubes.  Place it in a heat safe container (I like to use a thermos for this as it holds the heat longer) and pour 2-3 cups of boiling water over the ginger.  Let it steep for several hours.

I was thinking about using this for my desktop wallpaper...

Sunday, February 17, 2013

Fried Shrimp


Fried shrimp...it might conjure up the image of some butterflied shrimp tails covered in breading and then deep fried in some frightening trans-fat laden vegetable oil and served with a lackluster side of mediocre tartar sauce and a lemon wedge.  Well, if that's the image that came into your mind before you saw the photo above, I'm here to set the record straight, because this is how you do fried shrimp. 

It's fast, it's easy, and if you have never had shrimp this way it will probably change your opinion on this humble crustacean.  The ingredients are few, but quality is especially important here.

Start with some large whole shrimp.  Whole shrimp!  Don't just buy the tails and call it a day.  The body is where all of the flavor is, so get about a pound (depending on how many you are serving) of very fresh whole shrimp from your local merchant of choice.

You'll also need some quality rendered leaf lard.  I render my own from a local farm that sells the hard kidney fat from their whey and acorn fed pigs.  The rendering process takes a little while, but it is very easy and you can produce a lot of lard and store it in the freezer for a long time.  Lard is excellent for frying because it is heat stable, does not impart any flavor, and makes food incredibly crispy.  In fact, I eat the entire shrimp when cooking them in lard (head, body, tail, shell, legs, eyeballs..everything).

Wash the shrimp under cool water and pat dry.  Toss them with seasoning of you choice (I used a paprika and celery based mixed seasoning from my favorite local spice shop for these, but salt and pepper are great as well).  Heat about 1/4" deep layer of lard in a stainless steel or cast iron skillet and add the shrimp carefully into the oil.  Take care not to crowd them; it is better to cook them in several small batches than to overload the pan.
Cooking time really depends on the size of the shrimp, but fortunately they have a built in cooking indicator.  When you see that the shrimp have turned pink just a little bit more than halfway up their sides, flip them over and cook for a few more minutes until the entire shrimp is pink and crispy.  The meat should be cooked through but not tough, and the shells will be so crisp that you can eat these whole (and I suggest that you do at least try it for full effect).
Simply remove from the oil and serve hot.  This is serious 'finger food', so keep your sides simple.  Some broccoli or even brussels sprouts would make a good pairing.
Everything on this plate is edible; from the crispy shells to the tasty guts

Saturday, February 16, 2013

First time...not always a charm.


Earlier this week, I decided to try my first attempt at making naturally lactofermented vegetables.  These are something that we have both been eating more of lately, in the form of sauerkraut and pickles, but the only non-pasturized naturally fermented vegetables that I have been able to find commercially available are confined to these two options.  There is only so much kraut that one can eat, and pickles don't go with everything (though Christa would probably disagree with me on that last point).  Given this, and my desire to prepare most of what we eat from as close to scratch as possible, I want to become more familiar with the art of natural fermentation.

Lactofermentation is a fairly straightforward process (so I say).  Food is submerged in liquid, either the liquid naturally occurring in the food that is released during chopping and crushing, or a solution of brine that prevents the growth of undesirable bacteria until the beneficial microbes have a chance to dominate the environment.  Once these desirable microbes have colonized the food, they produce lactic acid which in turn prevents spoilage and the growth of dangerous microbes.  The process also increases the available nutrients of the product being fermented, and preserves it naturally while giving the whole shebang a tangy flavor that many people (ourselves included) enjoy.

Carrots would be my first foray into the world of home fermentation.  Why carrots?  Well, not only are they colorful, tasty, and...ok, to be honest with you I had nearly 5 pounds of carrots in my refrigerator and I was starting to run out of ways to use them.  One can only make so much carrot soup (which is delicious and will soon have its own post), and my latest renditions of carrots-in-everything were getting kind of old.  So, my muse was a giant sack of carrots, and I was compelled by little more than the shear quantity of them at hand.

I got my recipe for fermented ginger carrots from Nourishing Traditions, which is an interesting cookbook.  The recipes are firmly founded in solid nutritional concepts, but to be honest with you many of them lack a certain...how do I put this...most of the ones that I have tried don't really come together all that great.  It is a wonderful source of inspiration, but I am convinced that the author is not a cook by trade.  Again, I like the book, I have recommended it, but I think that a lot of the recipes need some tweaking - this is fine, as I rarely follow a recipe to the letter after the first time that I have tried it (and sometimes not even on the first attempt).  Oh, so these carrots.  That's what I was trying to tell you about.  The recipe called for 4 cups of shredded carrots, a tablespoon of salt, some ground fresh ginger, and some liquid whey.  I happen to have had all of these available.

I pounded the carrots as best as I could after shredding them and mixing them with the salt and ginger.  Carrots are rather hard, and they didn't produce much liquid of their own.  I added the prescribed amount of whey, packed the whole deal into a VERY clean one quart mason jar, and then proceeded to pound on the vegetables with the large handle of a jar scraper, since I do not own a dedicated vegetable tamper.  I needed to add a little bit more whey in order to ensure that all the carrots were submerged entirely, but finally I sealed up the jar and placed it in my food dehydrator on the kitchen counter.  I put it in the dehydrator so that it would be dark....effectively it served as a very expensive box.

Bubbles!  I am god of the pickles!
Three days later, and upon inspection of the jar I saw bubbles.  Bubble!  Success!   The little microbes had been hard at work, producing gasses and lactic acid.  I was on the fast track to becoming a master of fermentation.  The sky was the limit, and I thought of all of the relishes and pickles that I would soon be turning out in quantity, and where I would put my huge cucumber garden in order to satiate Christa's unending desire for pickles of all kinds.  I would need to start growing cabbage, too, and of course the mason jars weren't going to cut it.  I began trying to figure out in my mind whether a 10 quart or a 15 quart stone crock would be better suited to making sauerkraut for our purposes.

And then, I opened the jar to try my delicious pickled carrots.  Ok, first of all I should have expected the top of the jar to blow off like a jack in the box when I loosened the retaining ring, but it still caught me completely by surprise when it hit the ceiling.  Expletive deleted.  I performed a smell test.  So far, so good!  Then, when I grabbed a fork to sample some of the carrot relish, I was treated to this sight.
Yech!  So, maybe not a pickling deity. 
Slime.  Slick, clear, slime.  It was as if the carrots were suspended in mucous.  Some quick research led me to believe that some undesirable bacteria had colonized my carrots and turned my dreams into a pile of gooey snot.  I have since read that using grey salt (which I did) may be inadvisable, as the moisture can sometimes harbor unwanted microbes that may be introduced into the fermentation.

I dumped the contents of the jar into the garbage can.  Fortunately it was only a single, small test batch.  I'm not discouraged by the process, either.  While it can be easy to get caught up in the moment, it's not realistic to expect perfect results the first (or second, or third) time that we try something.  They may not even be edible.  This applies not just to pickled carrots, but to pickled cucumbers, or any recipe, or any new skill or hobby.  It's one of those 'life lessons' that you hear about and hope that you recognize when they happen.  Don't let a single failure stop you from giving it everything you've got next time around, and recognize that you'll probably make mistakes along the way, whether you are trying to make carrot relish or paint your house or find that one right person to share your life with.  Let it go and focus on the now.

That's all.  Nothing tasty to share with you today, but hopefully one day I will have some good recipes for pickled something-or-other.  Until then.


Friday, February 15, 2013

Venison and Barley

 Sometimes it pays to cook all of the components of a dish together, especially if it is a slow cooked meal.  However, other times it is preferable to cook a dish such as this in separate stages in order to get the most out of each component of the recipe.  This works better as the latter.  The use of a slow cooker and cooking in stages makes the actual active cooking time fairly short and spread out.

Ingredients:
  • 3-4 lbs of venison leg roasts, cut into large chunks (or any other red meat)
  • 4 cups of beef stock
  • 1 large onion, sliced
  • 10 cloves of garlic, whole
  • 2 cups of barley
  • 1 pound of mushrooms (shitake and crimini) 
  • Fresh rosemary 
1)  Start off by browning the meat in a large pan with some tallow.  Any red meat would be fine, I used venison because I have a freezer nearly filled with it.  Beef, lamb, horse, goat, or any other red meat would work just as well for this.  Transfer the now browned meat to a slow cooker and add the onions, garlic, and stock.  Cook this on low overnight (or for 8-10 hours).  Remove everything from the slow cooker except the stock and reserve.
Put the meat, onions, and garlic in the refrigerator for now.
2)  Par boil the barley in a large pot of water.  I always partially cook barley before I put it into a soup or a stew because it has an ungodly capacity for liquid absorption.  In fact, this dish was going to be a stew, at least conceptually.  While you are doing this, clean the mushrooms and cut into a rough dice.  Add them to the stock along with the rosemary and the drained barley.
mushrooms float; barley sinks
3)  Cook the mushrooms and the barley for another 8-10 hours in the slow cooker.  The barley will probably have absorbed all of the stock from the pot, and you will have only a mix of barley and mushrooms.  I feel like no matter how much stock I would have started with, the barley would have just sucked it all up.  This is fine, really, as all of the flavor and nutrients of the beef stock have been incorporated into the barley, which in and of itself is pretty bland.  Remove the rosemary at this time, unless you enjoy picking little sticks and hard leaves out of your teeth later. 
the stock has been completely incorporated into the barley and mushrooms
4)  Shred the venison and add it back into the slow cooker along with the onions and garlic.  Stir everything together and allow the meat to heat up.  Plate into a heated serving bowl.  Rosemary makes a good garnish.  You can pour some more heated stock over this when you serve it if you'd prefer a more soup-like presentation.  I served up the first batch as pictured below, but later on I ended up adding anther quart of stock cut with some water just to have more of a soup...the barley absorbed most of this liquid, too, when I put those leftovers in the fridge.


Wednesday, February 13, 2013

Cookie Dough

These aren't really cookie dough...if you bake them, they will not turn into cookies.  However, they taste remarkably similar to actual chocolate chip cookie dough, but are composed of fuit, nuts, and (gasp) some actual chocolate chips. 

This is way more than a serving size


I know that I got the inspiration for a date/nut based snack bar from somewhere on the internet that I cannot remember at this time and I apparently forgot to bookmark it.  However, I tweaked this one a bit, and I'm sure that the place that I first read about it didn't invent it, so I'm not going to lose any sleep over it. 

Ingredients are as follows:
  • 2 cups whole medjool dates, pitted
  • 1 cup whole almonds
  • 1 cup whole pecans (or crushed if that's what you have; it really doesn't matter in this recipe)
  • 1 cup chocolate chips
  • 2 Tbsp coconut oil
  • 1/2 cup finely shredded coconut
  • 1 tsp real vanilla extract
  1. Put the dates, almonds, and pecans into a food processor and process them until they begin to look like a coarse paste.
  2. As the mixture starts looking pasty, pour in the coconut oil, coconut, and vanilla extract
  3. The contents of your blender should be a paste by this point in time.  Dump out into a bowl and stir in the chocolate chips.  It would be tempting to just throw the chips into the food processor and let your handy dandy kitchen gadget do all of the work.  Don't.  It will pulverize your chocolate chips, and the resultant heat of friction will also melt them and just make a big mess.  Yes, I am speaking to you from experience at this point.
  4. Press the mixture into a baking dish lined with a sheet of wax paper.  It doesn't have to be a baking dish, as you won't actually be baking these.  It could be a serving dish, or a platter with high sides, a large tupperware container, a firm hat, or a pair of crocs...so long as you can easily remove the bars from the container once they have cooled down and become firm.  Once that happens, pop the sheet of "dough" out onto a cutting board and cut into portions.  I wrapped them in foil for easy transportation.
I'd sell out my own brother and sisters to a stranger in a sledge for a tray full of these.


Oh, so the chocolate chips that I bought happened to be organic.  Fancy, right?  I almost mentioned that in the ingredients list...like, "your chocolate chips must be organic, or this whole recipe will be a giant bowl of fail".   I don't really have a firm stance on the benefits of organic chocolate chips, as I have not done much research on the topic.  I didn't even buy organic chips to be hip and/or cool.  I bought them because they were available in the bulk bin of my grocery store, whereas I would have otherwise had to buy an entire bag of 'regular' chips.  Since this is not an ingredient that I keep on hand regularly, I opted to just purchase a cup of the fancy chips, which I'm sure I ended up spending as much money on as I would have if I got a whole pound bag of the non-organic.  /rant

-J

Monday, February 11, 2013

Rendering Fats

Tallow and Lard

Tallow and lard are two fantastic cooking fats, each with their own unique properties.  While it takes a few hours of fairly passive work to produce these kitchen staples, you can easily make enough to last for a year in one kitchen session.  I think that it's a shame that both of these fantastic ingredients have fallen out of favor in so many modern kitchens.  Whether for browning meats, sauteing onions, baking pies, or the beginnings of an incredible gravy, there are some instances when you really can't substitute for the originals.  By making your own from known sources of animal fat, you'll also be able to compliment your diet with a fantastic array of healthy lipids. 


Many of the recipes that we post here do in fact call for either lard or tallow as a minor ingredient, so I think that it would be worthwhile not only to talk about the applications of each, but also why we use them and go over a simple step by step of how you can keep your own kitchen stocked with both.

To start, why should we go through the trouble of producing either tallow or lard, and for that matter what exactly are they?  Both are the rendered forms of animal fat from either cattle (tallow), or pigs (lard).

Tallow on the left; Lard on the right


Tallow is mostly composed of heat stable saturated fats (55%) and monounsaturated fats (40%).  The small amount of polyunsaturated fats will have a favorable ratio of close to 1:1 omega 3 to omega 6 if you source your beef fat from pasture raised cows.  Tallow is naturally resistant from going rancid.  The fats from pasture raised cows also contain natural levels of conjugated linoleic acid (CLA).  Food fried in tallow has excellent flavor and tends to absorb less fat than that fried in vegetable oils.    Anytime that I want to impart some subtle, almost beefy flavor to a food such as when browning meat, or cooking onions, or making gravies, tallow is my first choice.

Lard is actually made up mostly of monounsaturated fats, but like tallow contains a healthy compliment of saturated fat as well, including the antimicrobial palmitoleic acid.  Lard is softer than tallow when chilled (tallow is hard and nearly waxy, while lard tends to be very firm like butter).  Lard also imparts no flavors to the dish, but will make anything cooked in it exquisitely crisp.  Sometimes I will rub lard on the skin of a chicken before roasting, but it's also fantastic for frying shrimp, cooking potatoes, and as a must-have ingredient in pie crusts. 

For more details on the actual fatty acid contents of both tallow and lard, I would refer you to this excellent book:  Know Your Fats

The advantage of rendering your own lard and tallow are that you can be very picky about the animals that you select when buying the fat.  "Garbage in, garbage out" applies here, and if you want to heave healthy fats, much like healthy meats, you must choose animals that have been fed and raised properly.  Even pasture raised, grass-fed beef fat from the small-scale farm near me where I buy most of my meat from runs only about $3/lb, so it is well worth the investment.  Through rendering the fats, they become easier to work with (rather than cut off a slab of fatty tissue, you can scoop out the desired quantity from a jar) and also last longer in cold storage (the water and proteins and other bits that might rot have been removed from the fat). 


All that being said, it is time to produce some rendered fats.  The following example uses beef fat, but the same process applies for pork fat, lamb fat, or even butter (which would yield ghee).


Begin by thawing out the fat that you have obtained, if necessary.  At this point, the material that we are referring to as 'fat' is actually a collection of lipids, connective tissue, water, blood vessels, and possibly some bits of muscles as well.  The goal is to extract only the lipids (fats) from this mass of animal fat.
several pounds of hard beef fat from a local pastured cattle

 In order to expedite the rendering process, it is necessary to increase the surface area of the fat.  do so by cubing the fat into 1/2-1" pieces with a sharp knife.
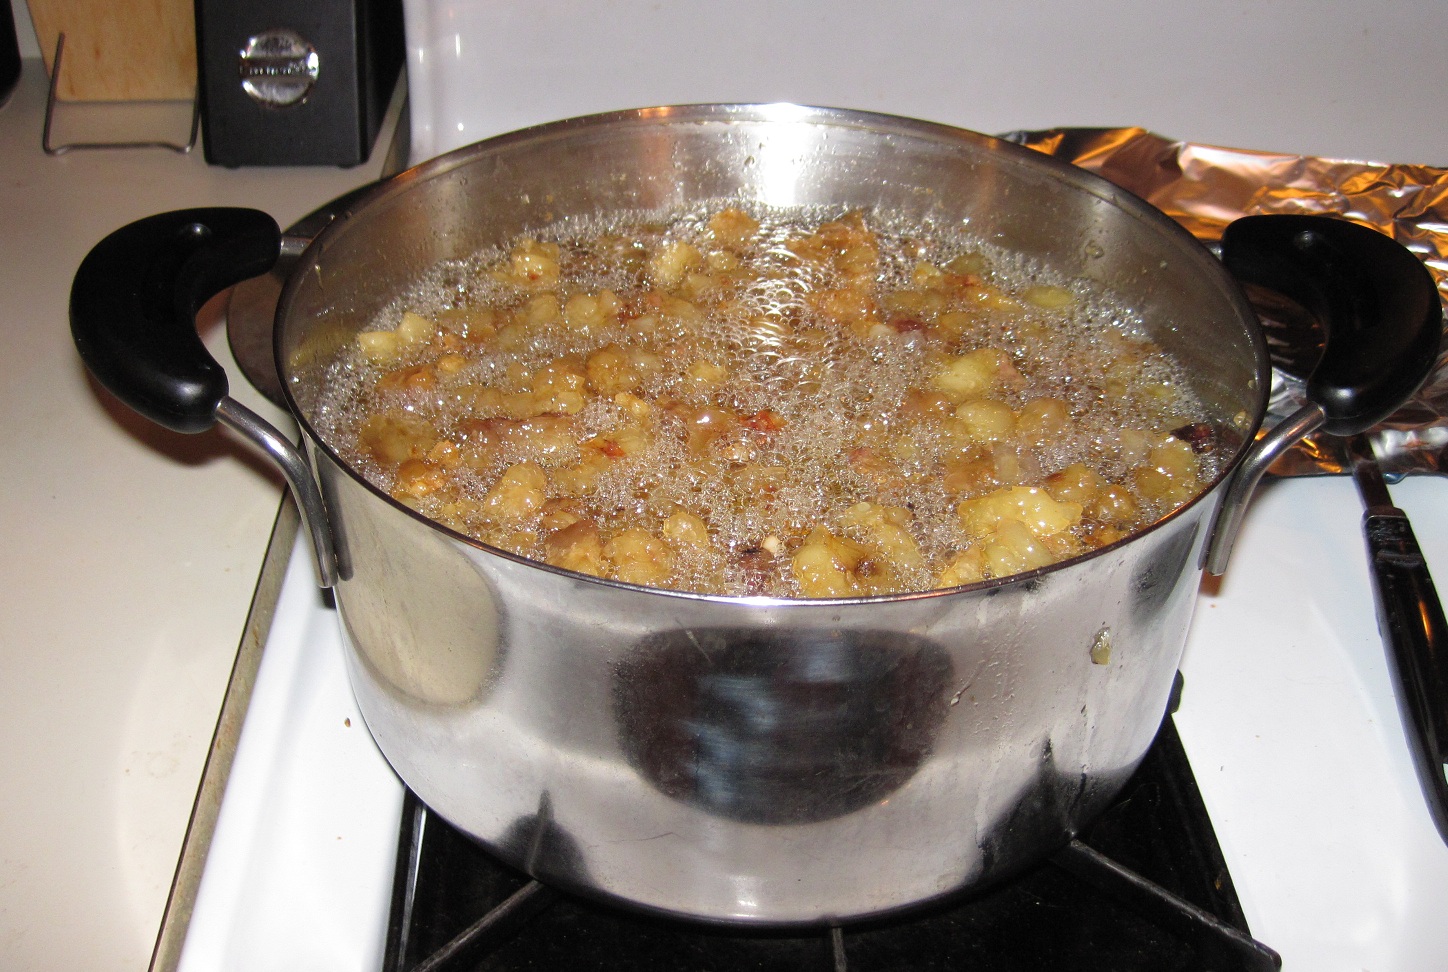
Place the pieces of fat in large stock pot and add just enough water to barely cover the bottom of the pot.  While not entirely necessary, starting out with the water in the pot will help prevent browning or burning of the fat.  This is not something that we really want to cook or impart any such flavor to.
Place this on the stove and turn on to medium low.  The water in the pot should just begin to simmer, and the fat should not fry.  If that fat starts frying you have the heat up too high.
Eventually, the fat will warm up and begin to soften.  Some of the actual fat itself will begin to melt out of the chunks, along with some water.  The liquid that begins to accumulate in the pot is a mixture of water and liquid fat.  Again, make sure that the heat is kept low enough so that you don't end up frying any of this.

After about an hour, perhaps longer, the chunks will have shrunk quite noticeably and the liquid will probably be bubbling away.  While the chunks of tissue will begin to get darker, ensure that the fat isn't frying by observing to see if there is any smoke.  The bubbles forming should be solely from the rapidly boiling water that is now escaping your pot.  This operation will take a couple of hours, so don't try to rush it by burning or frying your tallow.
Once the fat chunks have reduced in size considerably, it is time to begin straining out the liquid.  I recommend using a coffee filter, as cheesecloth really isn't fine enough to capture all of the little particles that are going to be suspended in the liquid.

 Eventually the pieces of fat will have given up all of the liquid that they can and will begin to get much darker.  When this point is reached, stop the rendering process and either drain and reserve the little tissue nuggets or discard them.  Some people like saving these to add to soups, but personally I have not had much luck with that.  Transfer all of the filtered liquid to a very clean pot and bring the temperature up to 250F.  If the liquid does not bubble, it is pure fat and the rendering process is over.  If the liquid bubbles, it is merely the remaining water boiling off, so hold the temperature fairly constant until the bubbling ceases.  Don't overheat the tallow or you may potentially burn it once all of the water has boiled off.
liquid tallow looks almost golden in color

Liquid tallow from grass fed cows will have a yellow to amber appearance.  The fat tends to accumulate vitamin E, CLA, and beta carotene that are lacking from grain-fed feedlot cattle.  It will be yellowish to slightly off-white once cooled.  Leaf lard (below) should be almost totally clear.  It will solidify to a snow-white solid once cooled.
liquid leaf lard, poured into jars and cooling down

Store a little of your rendered fat in a glass container in the refrigerator.  The remainder can be jarred and put into the freezer for long term storage, or you can even pour it into muffin tins and then freeze the little fat pucks in vacuum bags until you need them. 

Saturday, February 9, 2013

Sautéed Brussels Sprouts


Our meals might seem very animal-centric.  This is because they are; I make sure that Christa and I both eat a variety of wild game, fish, pasture raised beef and chickens, and most of their organs as well.  We eat soups and sauces made from bone stocks, and regularly enjoy good eggs, milk, yogurts, and cheeses. 

That's not to say that we don't have plenty of fresh plant matter daily - we do, both cooked and raw.  It's just not typically as glamorous, so I'm less apt to blog about it.  This post is about some vegetables.  Nice, leafy vegetables, cooked quickly that make a great side dish to just about any hot meal.

So, without further ado, here's a surefire method of preparing Brussels Sprouts.  (That's Brussels Sprouts, not brussel sprouts)

Ingredients:
  • ~1 dry pint of Brussels Sprouts; cleaned and halved
  • 4 cloves of garlic, sliced into coins
  • 1 T of good butter
  • 1 T of olive oil
  • Salt and Pepper
  1. Melt the fats together in a skillet that has a tight fitting lid (leave the lid off for now).  
  2. Add the garlic and toss quickly.  As soon as it begins to brown, place all of the Brussels Sprouts cut side down into the hot pan.  Do not disturb them for 4-5 minutes while the cut sides brown.
  3. Toss the pan to flip the sprouts over (they don't all need to flip, don't worry about that) and then pour just a small amount of hot water (roughly 1/8 cup) into the pan and put the lid on.  Steam the sprouts for another 5 minutes to cook them through until they are tender.  
  4. Remove the lid, boil off the water, toss once more to coat everything and plate the garlic and sprouts in a warmed bowl. 
They make a fine summertime side dish for shrimp and vegetables.